Battle of Naya Chor
Pakistan’s Naya Chor, opposite the Barmer Sector in Rajasthan, was the Sector Headquarters of the Pak Command, and the key node, defending deeper penetration into Sindh.
Tasked with the capture of areas upto Naya Chor, on the night of December 4/5, 1971, India’s 11 Infantry Division launched a three-pronged offensive, the main thrust being the Munabao-Parbat Ali-Naya Chor axis. IAF carried out airstrikes on the evening of December 4, to facilitate the task. By the night of December 12/13, 1971, Indian forces had penetrated more than 80 km into enemy territory, and in a particularly daring offensive, captured Parbat Ali—a fortified and formidable defensive position. Three successive counterattacks by Pakistan were beaten back, leaving 57 Pakistani soldiers dead and 35 POWs.
Pakistan was compelled to reinforce the Naya Chor sector, with reserves diverted from sectors opposite the Western Command. Challenges of desert mobility and the declaration of ceasefire three days later stopped the offensive at Parche Ji Vari, short of Naya Chor.
ALSO READ: And Thus A Desh Was Born
Battle of Fazilka
Fazilka was vulnerable to multiple Pakistani attacks—through the Pakistani enclaves south of the river Sutlej, through Jalalabad in the north, and through Sulemanki bridgehead in the west. India had covered all these approaches through a fortified, anti-tank obstacle—the Sabuna Distributary. The dilemma on whether to have the weight of the defences close to the international boundary ‘to prevent loss of territory’, or defend Fazilka in strength, persisted even as battle was joined.


On December 3, 1971, Pakistan, charged through the border outpost, and launched a strong attack on the Indian covering position. The Indian covering troops deployed on the Sabuna Distributary were ordered to withdraw. The Indian forces blasted the bridges on the Sabuna Distributary, except the Beriwala Bridge that fell into enemy hands.
The resources were stretched in undertaking multiple tasks of defending Fazilka, containing the enemy bridgehead, and launching repeated counterattacks. While the enemy could not be dislodged from Beriwala Bridge in the subsequent counterattacks, the Indian troops managed to re-establish themselves on the tail end of the distributary. Lasting over 14 days, Indian troops suffered heavy casualties: 189 killed, 425 wounded, and 196 missing.
ALSO READ: How The West Was Won
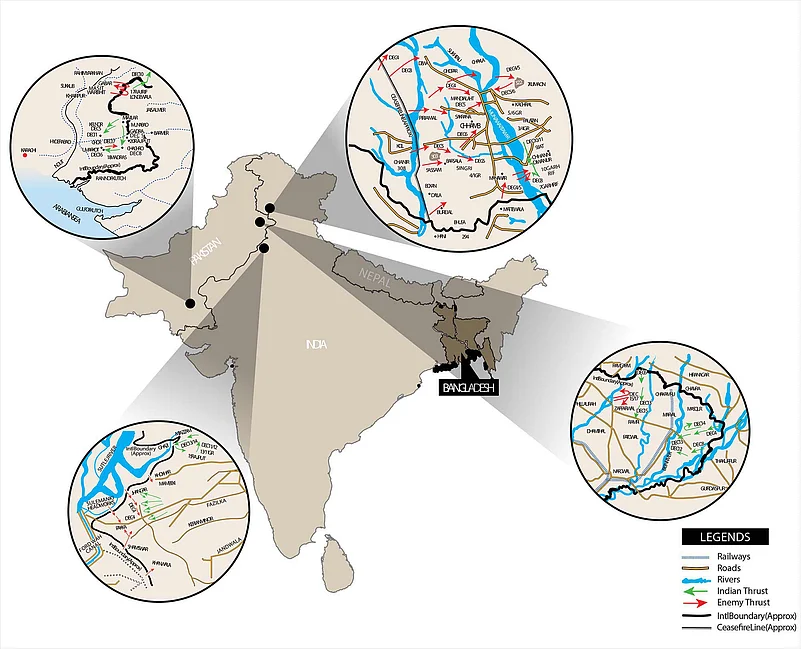
Battle of Chhamb
The Chhamb Sector was of strategic interest to both Pakistan and India. Possession of Chhamb by Pakistan implied a threat to Jammu, via Akhnur. The Akhnur Bridge was vital for India; it was the only link across Chenab connecting Poonch, Rajauri, and Nowshera with Jammu.
The Indian forces were planning an offensive in this sector, envisaging that they could potentially drive a wedge between Pakistan’s Kharian-Jhelum complex and Sialkot sector.
On December 1, 1971, India’s offensive strategy was reversed as it was learnt that Pakistan was launching a pre-emptive attack in this sector in 72 hours. Indian forces had to hastily adopt a defensive posture.
ALSO READ: To The East We Went and Won It For Them
Pakistan initiated its offensive on December 3, 1971, before the Indian Army could complete laying protective minefields. Despite these odds, the Indian forces put up a stiff resistance. The heroic counterattacks here were superlative feats of bravery. While Chhamb fell to the enemy, the Laleali Post in the Chhamb sector was defended despite being attacked twice. Finally, the enemy’s objective of capturing Akhnur was thwarted, albeit with high casualties.
Battle of Basantar
The Shakargarh Bulge located between the Chenab and Ravi rivers, projects towards the Madhopur Headworks, and the strategic highway linking J&K with Punjab. The bulge afforded opportunities to Pakistan to launch offensives in multiple directions.
When the visualised Pakistani offensive did not happen, India decided to take the initiative. On December 5, 1971, India launched an offensive with 54 and 39 Infantry Divisions, on a broad front between Degh Nadi and Basantar river.
ALSO READ: All Boots Lead To The Sugar Bowl
54 Infantry Division along with 16 Independent Armoured Brigade was tasked to capture Zaffarwal and destroy enemy’s reserves. The Indian forces established a bridgehead south-west of Basantar, drawing furious enemy counterattacks, preceded by heavy artillery shelling. Indian tanks successfully destroyed a major portion of the enemy’s armoured and infantry brigades, in beating back the repeated counterattacks. According to Brig. Jahangir Karamat of the Pakistan Army, the Pakistani Armoured Brigade “lost almost fifty tanks” and India’s losses “were less than one third”.
Battle of Longewala
Pakistan visualised an Indian offensive in the area of Rahimyar Khan as it could potentially enable India to disrupt the Karachi-Lahore communication links. Hence, it initiated a combined armour–infantry offensive towards Longewala, with the objective of eventually capturing Ramgarh and Jaisalmer—100 km from Longewala along a motorable road.
On the night of December 4/5 1971, Pakistani tanks closed in on the Indian company position at Longewala. Around 5 am on December 5, the Pakistani troops attacked with two tank squadrons and two infantry companies. Despite the unfavourable combat ratio, Indian troops repulsed the attack and held the post until the IAF’s Hunters arrived and destroyed half of Pakistan’s tank fleet. The enemy was left with no choice but to retreat. The Battle of Longewala witnessed one of the most disproportionate tank casualties for Pakistan. The enemy’s objective of capturing Ramgarh and Jaisalmer was foiled.
Defence of Srinagar Airbase
Neutralisation of forward airfields in the Western Sector of India was considered vital by Pakistan to prevent a two-pronged offensive by India in the Shakargarh Sector. Pre-emptive strikes from Pakistan, as a tactic of maintaining pressure on the Western Sector, was anticipated. 18 Squadron of the IAF was responsible for defence of Srinagar airfield.
ALSO READ: 50 Years Of Unlearning
On December 14, 1971, six Pakistani Sabre aircraft of the 26 Squadron attacked the Srinagar airfield. Flying Officer Nirmal Jit Singh Sekhon was still on the runway when the attack came. He immediately got airborne and engaged the Sabre formation. He succeeded in shooting down one Sabre and setting another one on fire before being overcome by the superior number of enemy aircraft. Even Pakistan Air Force officer Kaiser Tufail has acknowledged his courage and skill. Flying Officer Nirmal Jit Singh Sekhon was awarded the PVC posthumously.
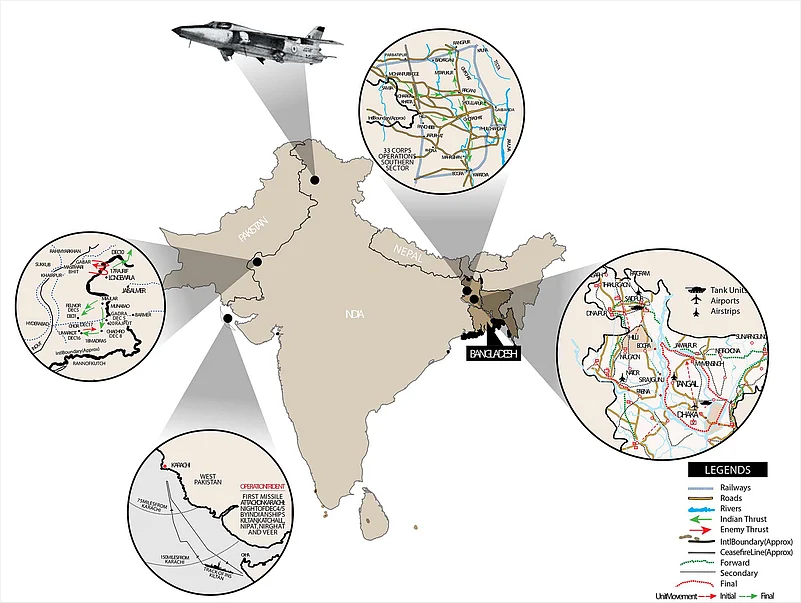
Operation Trident
The heavily defended port of Karachi was vital for Pakistan’s maritime trade. HQs and major establishments of the Pakistan Navy, facilities for import/export, warehousing, and petroleum refineries were concentrated here.
ALSO READ: Taka Talks In A Tailored Suit
Pakistan’s naval strategy was to inflict maximum damage on India by launching a pre-emptive strike at the commencement of hostilities and recoil into Karachi. Following Pakistan’s pre-emptive airstrikes on Indian airfields on December 3, India launched Operation Trident, a naval offensive against Karachi on the night of December 4/5, 1971. In a bold attack, small missile boats sailed through enemy submarine, aerial reconnaissance and strike capabilities and attacked Karachi. Another naval missile attack was launched on the night of December 8/9. These operations resulted in several Pakistani casualties and a de facto naval blockade, hurting Pakistan’s economy and severing the lines of communication with East Pakistan. The Indian Navy achieved its objective of establishing supremacy in the Arabian Sea.
Battle of Hilli
Hilli was a key Pakistani position dominating the main communication links between the north and the south of East Pakistan. Hilli provided access to Bogra, where there was a railway yard, an airstrip and a large logistics base. It was the tactical HQ of Pakistan’s 16 Infantry Division and 205 Infantry Brigade.
ALSO READ: Going Mega For Growth
On December 8, India’s 202 Mountain Brigade attacked Hilli, supported by the IAF. India’s manoeuvre succeeded in misleading the Pakistani defenders to believe that the Indian offensive was along the strongly fortified Hilli-Gaibanda approach. The Indian forces breached areas north of Hilli and struck at the enemy’s rear, splitting Pakistan’s 16 Infantry Division’s defences; with 23 Brigade in the north isolated from 205 Brigade in the south. Eventually, the Indian Army and Mukti Bahini were able to surround and capture Bogra too. As more and more Pakistani troops were sucked into the battle for the defence of Hilli, the Indian advance to Dhaka met with considerably less resistance.
Tangail Airdrop
Pakistan’s defences were based on ‘fortress defences’ in important communication centres, to prevent the advance of Indian forces. The riverine terrain in East Pakistan made it critical for India to secure bridges to ensure speedy advance of troops and deny Pakistani forces the opportunity to sidestep or readjust positions.
Following India’s successful breakthrough of border defences, Pakistan’s 93rd Brigade was being pulled back from Mymensingh and Jamalpur in the north for the defence of Dhaka. Tangail was significant as it provided the shortest route to Dhaka.
On December 11, India airdropped 2 Para north of Tangail at 4:50 pm. The objective was to capture the Poongli Bridge and the ferry site to its east, to intercept and destroy enemy forces withdrawing from Jamalpur and Mysensingh. An effective deception plan managed to enlarge the perception of the airdrop to appear to be of a brigade-size. By 8 pm on December 11, both Poongli Bridge and the ferry were secured. Pakistan’s 93rd Brigade, withdrawing towards Tangail, counter-attacked the bridge, but were repulsed with heavy casualties.